GAMPS logo

GAMPS logo
ギャンプスのロゴです。

2018年10月14日日曜日

Fender Champ SF modifying to Princeton AA964

I have Fender Champ silverface in my stock. It has been modified already by myself.

MOD = Vibrato circuit was disabled.  Grill cloth was replaced with gold one.
Jpeg of SH Champ front view
SF Champ in my stock, already modified. Front view

MOD = AC Inlet has been added. Speaker Jack has been changed to phone from RCA and relocated on the back panel.
SF Champ rear view 
MOD = CT has been added instead of decoupling resistor 1K ohm 1W.
The power amp stage is still single ended 6V6 though.
One preamp tube has been added for more gain stage.
CT( Choke Transformer ) and a pre tube has been added 

MOD = Removed circuit board.  Wired resistors and capacitors using terminal strips.
Used multiple axial electrolytic capacitors instead of multi section electrolytic.
Circuit has been remounted completely

All  mods were for experimental purposes to determine the sound difference.
And the data was captured. The experiment has been done.

So, it's the time to restore the amplifier.

Restoring back to the original Champ is not so interesting or enjoyable.

I wanted more joy.

Well, PT of the Champ and the Princeton is the same.
The same voltage and the same current value.

So if I replace the OT with one for Pushpull and if I add a US tube socket for another 6V6, I will be able to convert the Champ to Princeton !!! Need the circuit modification too of course.
Parts number and the specification of all the Fender guitar amplifier's transformers
Fender amplifier's transformers
 decided to restore my scratched Champ to Princeton amp.

 Step 1.  Speaker

 When the experiment has been performed Original speaker was replaced with Jensen 8" ceramic.
The picture of cabvinet which mounts Jensen speaker
Original speaker has been replaced with Jensen ceramic

During the experiment, it was replaced with Fender replacement 8" speaker.
  It is probably made by Eminence.
Fender 8" replacement speaker
Then after mounted Fender Replacement speaker 

This time, replaced with the 10" Celestion. Speaker hole is the same as 8", but added extra screw holes for mounting 10 inch speaker.
10 inch celestion has been installed

Step 2.  Transformer and other elements

Removed CT.
Replaced OT from SE Champ to one for PP 17W 8K-8Ohm.
Installed one US tube socket.
Installed electrolytic multisection capacitor (F&T 36microfalad x2 )
Removed extra preamp tube socket

two pictures before and after of Chassiss top view
Chassiss top view difference

Step 3. Circuit Modification

Installed circuit board instead of terminal strips
Reduced electrolytic axial capacitor's quantity by using multi section.
Revived vibrato circuit
Assembled GAMPS original circuit inspired by AA964 Princeton.
Coupling capacitors are Orangedrop film, Murata ceramic and Sizuki film.
Resistors are 1W Ohmiote for power and 1/2W Kamaya carbon composition

Two pictures before and after of the circuit
Circuit view
Step 4. Bias adjust
 Differing from AA964, this amplifier has bias depth adjustment pot.
 Adjusted the pots by refering to 6V6 plate voltage and by measuring 6V6 cathode current.
A little colder setting.
Bias adjust
Step 5. Facade change
Replaced gril cloth with silver one from yellowish one
Speed and Intensity pot returned.
2 pictures. Before and after.
Front view before and after

Step 6. Rear view change
removed AC inlet--- power cord is inserted chassis under
removed speaker phone jack--- RCA speaker jack is located under
added a toggle switch.
This switches pentode mode and ultra lenear mode of OT and power tube operation mode.
Two pictures before and after of rear view
rear view before and after
Step 7. Made original foot switch for vibrato on off.

Made the original foot switch for vibrato on/off.
Box itself is made of  alminum to get lighter weight.
In order to lower the noise, put extra metal, brass and cupper for emphasizing zero volt grounding level of the switch box.
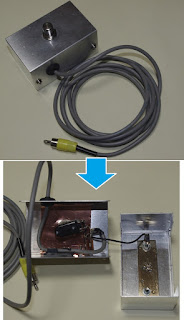
Upper picture is outside view and lower is inside
Vibrato foot switch facade and inside

Step 8. completion

Outer facade is The Fender Vibro Champ silverface and the circuit is modified to Princeton amp.
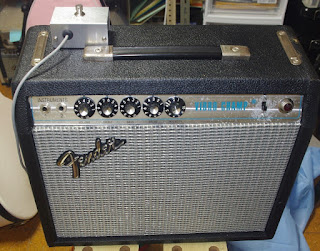
Front view of the amplifier, foot switch attached.
Front view

Rear view of the amplifier
Rear view

Will post the sound clip of the amplifier soon.

Hope you're going to have the nicest guitar playing life. Thank you.

2018年10月10日水曜日

ギターアンプ選びについて

私はハンドワイアードの真空管ギターアンプを精魂込めて作成したり、レストアしたり、オーバーホールしたりしています。

私の作るアンプが全ての人に合うなどとは思っていません。

「人それぞれ」と申します。

ギターをお弾きになる方も様々だと思います。

誰かが「真空管ギターアンプ最高」と言ったのをお聞きになり、
「自分も真空管アンプでないといけない」等とあせりを覚え、
真空管アンプを購入なさると、実は後で後悔なさるかもしれません。

今回は、ご自分用のギターアンプを購入なさりたいとお考えの方に、
こんな考えもありますよという意味を込めてブログを記述します。

【ケース 1】
ギターの音作りはエフェクターボードで完成しており、
会場で準備される異なったアンプに十分対応できる。
しかもその音に満足なさっているお方には、
5 stomp boxes, tuner and switching unit.
過去に店主が使用していたエフェクターボード

ハンドワイアードの真空管ギターアンプは不要です。
真空管の交換など細かいことを気にせずに済む、
値段も手ごろなトランジスターアンプを購入なさるのが
経済的です。

もしもあなたのサウンドに真空管のニュアンスを
取り入れたいとお思われた場合は、

× 真空管の特性をシミュレートしたり、真空管を1個だけ内包した
 エフェクターではご不満が残るでしょう

かといってハンドワイアードの真空管アンプは目的のためには高すぎます

〇 ここは基板(PCB) 配線の真空管アンプなど安い真空管アンプを
お買い求めになると目的は達成されます。
真空管のニュアンスがほしいだけなのですから。

私も過去に写真のようなエフェクターボードを持っていました。
そのときの経験から上記のように感じます。


【ケース 2】
ギターのボリュームは常に10(フルテン) が心地よく感じ、
ボリュームを絞ったときの音で演奏したこともないし、
するつもりも無い。というお方、

ハンドワイアードの真空管ギターアンプは不要です。

ハンドワイアードの真空管アンプを演奏する場合、
ギターのボリュームとトーンの目盛りの位置によって微妙に
ニュアンスの異なるサウンドを使い分けて演奏することが
できます。

ギター側のボリュームをしぼっても「使える音」が出せます。
つまりそれがハンドワイアード真空管アンプの醍醐味でもあり、
あなたの表現力を使いこなすチャンスとも言えます。

その使い方をしないのであれば、ハンドワイアードは高すぎです。

演奏中にギターのボリュームポットやトーンポットにしょっちゅう触れてニュアンスを調整するという作業が増えます。ギターのボリュームはフルテンに限るという人には不向きです。

ケース1と同じく、トランジスターアンプもしくは
基板回路をつかうことにより大幅なコストダウンをした
安価な真空管アンプで十分です。
Cheaper PCB is used
基板を使い大幅なコストダウンで安価なオールチューブギターアンプ

【ケース3】
何十年も前、ステージに備え付けの真空管アンプで
演奏したときの音と弾き心地が頭から離れない
現行のアンプを買ったり試奏したりしてみるが、
なんか違う。変に高域が耳についたり、
ギターのピッキングがしっくりしない。
厚みの少ない薄っぺらな音に感じてしまう。

というお方、ハンドワイアードの真空管アンプがお勧めです。

昔、膳所公園や浜大津で開催されたライブのステージに
立たせてもらった経験があります。
当時は自分のアンプは持っておらず、会場のアンプにシールド
直でギターをつなぎました。
そのとき使わせてもらった、アンプの音を体が覚えています。
当時のアンプはみなハンドワイアードの真空管アンプでした。

エフェクター無しでアンプにシールド直でつないだ
私の Greco のテレキャスター(1975年当時、新品で12,800円) で
十分使える音が出せました。
Handwired Tube Amplifier, Fender Bassman 50

後に、就職し、自分でアンプを購入できるようになりました。
しかし、その音に大いに違和感を覚えました。
れっきとした Fender であり Marshall であり、MesaBoogie なのに
「あの時の音」とは、ほど遠いのです。
中を開けてシャーシーの中の回路を覗いてみると、なんと基板が
使われています。私の仕事であるコンピューターハードウェアの
回路と同じテクノロジーが使われています。
音楽を通す回路に、
デジタル信号を安定して運べる代わりにアナログ信号を削り、捨ててしまうテクノロジーを使うことに違和感を覚えました。実はこれが私がアンプの仕事をしようと思ったきっかけなんです。
10 amplifiers
Amplifiers of printed circuit board. Exception is only a bassman  

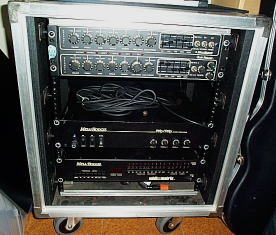
とても高価な下の写真のプリアンプとパワーアンプもブリントサーキット(基板回路)です。
ハンドワイアードと明らかに異なるサウンドしか出せません。
Pre-amp, Power amp and switcher is in a rack
MesaBoogie Quad Pre, Fyfty-Fifty power amp and Relay Switcher

現行アンプはたとえ「オールチューブ」と宣伝していても、
配線は基板 ( PCB、プリントサーキット) のものが主流です。
例: Fender の デラックスリバーブ・リイシュー等
この基板の音の欠点が「変な高域」であったり、中域が弱く「ピッキング
・ニュアンスが出しにくい」であったり、「厚みの無い薄っぺらい音」と感じる差の部分
です。

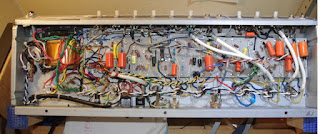
写真: 基板配線されたデラックスリバーブ・リイシュー
Picture of inner chassis
Fender Deluxe Reverb 65 reissue, PCB circuit

写真: 基板を取り除きハンドワイアード化したデラックスリバーブ
音は分厚くなり、中域が心地よく、変な高域はなくなり、ピッキングのニュアンスも出しやすくなります。
Picture of hand wired circuit
Hand wired modified Deluxe Reverb RI

【ケース4】
たとえどんなアンプでも必ずリバーブはオンにする。
リバーブの付いていないアンプであればエフェクターの
コーラス、ディレイ、リバーブのとれかをつないでいないと
なんか上手く演奏できない。
エフェクト無しで演奏するとなんとなく裸になったような恥ずかしさを覚える。

そんな人は一度ハンドワイアードのアンプをリバーブ無しで弾いてみると
世界が広がるかもしれません。

しかし、あくまで慎重に買う前に試してから買うか買わないかを決めてください。
「世界が広がるかもしれない」のであって必ずそうとは限りません。

言い方を変えますと、
プリント基板配線のアンプを弾いたときに、「明らかにハンドワイアードのアンプとは異なる」と感じ、さらに「弾きにくさ」を感じることが無い場合、ハンドワイアードのアンプは不要だからです。

早まって買ってしまって、しまったという後悔をしてほしくないです。
Precisely hand wired circuit


人が言ったことや書いたことを信用して真に受けるのではなく、それらはあくまで参考とし、最後は自分の耳と感性を信じ、自分が理解し、納得した上で音楽の道具を選んでください。

時として、
「バンドの先輩(もしくは尊敬なさってる人)がこう言ったから、こういうアンプが欲しい」とおっしゃるお方に出会うことがあります。
私のほうから少しばかりご要望とは異なる提案をしてみます。
そのお方は、かたくなに初めのご要望をお望みです。
理由は「先輩(もしくは尊敬している人)が言われたことが正しいから」です。
当然ながらご要望に寸分たがわないアンプをお買い求めになります。

しばらくして、「ここが良くない、ここをこうしたいがなんとかならないか」とご相談にこられます。実は一番初めに私がご提案した内容そのものにしてほしいということなんです。私自身も過去にギター本体についてそういうことを何度もやってきたものですから快く相談にのるように心がけています。

人の思い込みとは実にそんなもので、自分が実際に体験しないと、いくら人の意見を参考にしても実感がわかないものなのです。

以上ギターアンプ選びについて私の思うことでした。

良きギターライフを

The picture of handwired amplifier, GAMPS Browny G3
GAMPS Browny G3